The Conversation (0)
Sign Up
Begin by placing the vehicle on a flat surface with the parking brake applied. Loosen the wheel nuts/bolt on the first wheel by about half a turn (no more).

Raise the vehicle. If you are using a jack it is essential that you use an axle stand or suitable support as well. I'm using a vehicle lift but this is a straight forward job on the floor with jacks.
Remove the wheel nuts/bolts and lift off the wheel. Note: sometimes a bit of corrosion can make the wheel stick to the hub. In this case, make sure all bolts are removed and use mallet on back of rim.
If you are just changing the pads, skip this step. Now you need to loosen the screw that retains the disc. Wedge a screwdriver inside the vents of the disc to prevent it turning whilst loosening.

This is a 6mm Allen key. Mine rounded off so I banged in a torx bit no 45 and used that to undo the retainer
Now you need to remove the brake caliper. Turn the steering so the Caliper points outwards for easier access. Remove the spring retainer from the front of the caliper using the screwdriver.

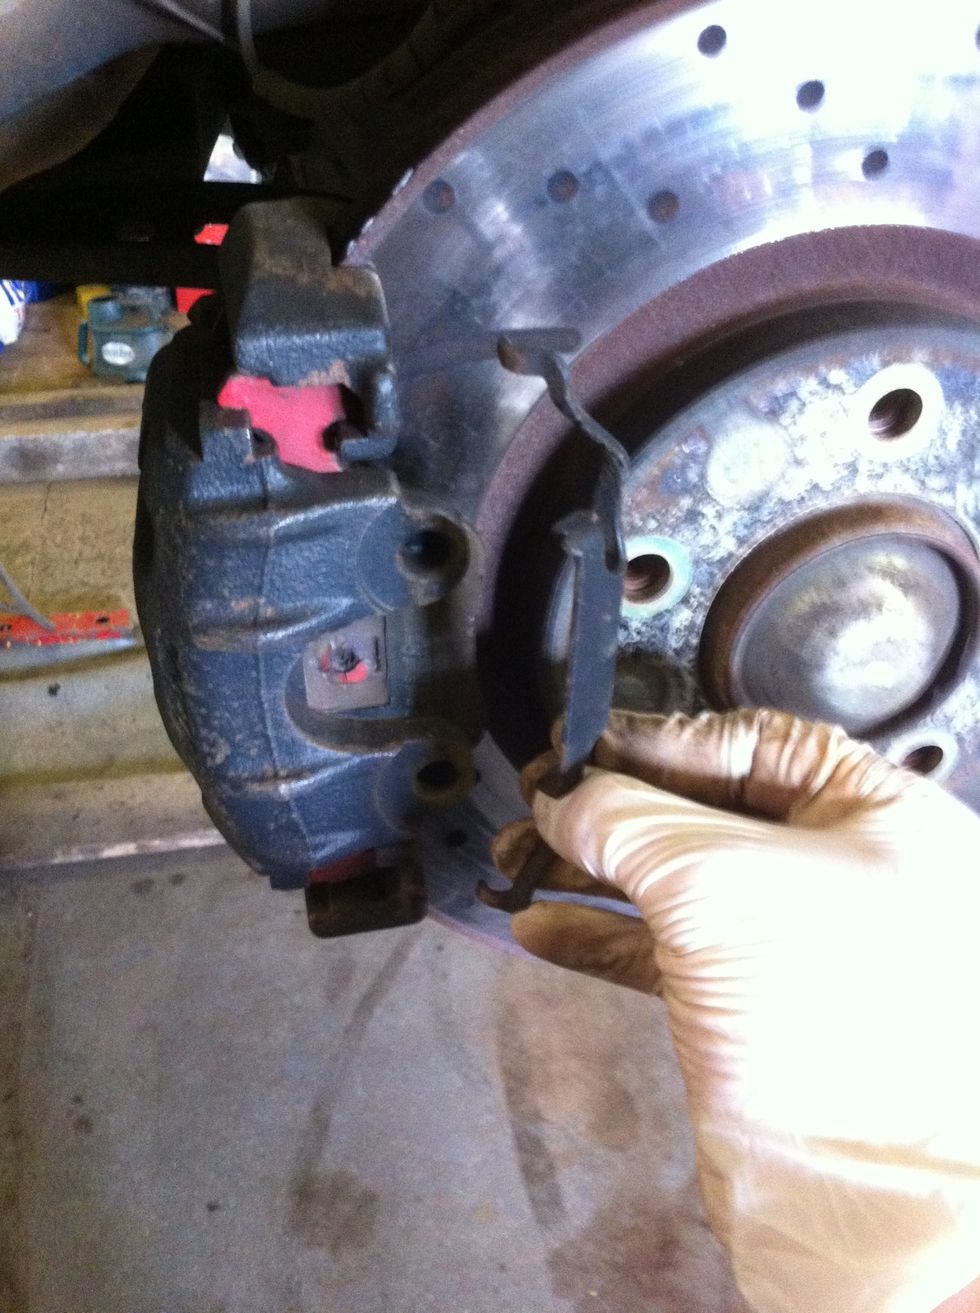
Now remove the two plastic plugs from the back of the Caliper (by hand) and then remove the two Caliper slides using the 7mm Allen key.


If you have a wire coming out of the large hole in the top of the caliper, that will be the wear indicator sensor. See my rear brakes guide for what to do with it!

Now the Caliper can be lifted off (you might need to prise it a little) and you can now remove the pads from the caliper (sometimes they stick a bit, you might need to prise them also).

Bit blurry oops

Hold the caliper thus and pull the inner pad parallel to the piston (there are springs that keep it joined to the piston).

Pad removed, the outer pad either falls out, or might need a bit of persuasion to remove it (it'll only be stuck in by corrosion, no springs).
Now you need to support the caliper so that it doesn't hang from the rubber hose. Use a piece of wire or string to hold it up. Note: this is best practice but I never to this, these pipes are strong!
Now to remove the caliper carrier you need to remove the two 16mm bolts. These should be really tight. You may need the bar you used for the wheel bolts. Loosen them both before removing one.


Hold the disc in place with one hand and lift the carrier clear. If you are lucky the disc will now lift straight off. If not, double check you have removed the retaining screw then start hammering!

With the disc removed, you can now see the hub. All the rust needs to be removed, use the sandpaper to remove all traces.
Ok, unwrap a new disc and give it a good clean and degrease using the brake cleaner and a rag. It is important to remove all traces of the protective coating.

Nice and clean. Some people like to grease this surface, some leave it like this and fit the disc. I'll be painting it before fitting the disc. Whatever you choose, it is imperative that it's clean

and that NOTHING gets trapped between the disc and hub. This is a major cause of brake judder as the disc doesn't run true. Install the retaining screw to secure the disc.
Now you need to be cleaning up the carrier, specifically the places where the pads locate. Use the small file to clean the slots out thoroughly. I've cleaned and painted mine (not necessary though)

This is the important part to clean. Once cleaned you should be able to insert and remove the pads with no resistance. Add grease to the slots only. Copper grease is fine. I use high temp grease.
Ok re install the carrier and tighten the 2 16mm bolts up nice and tight. Make sure none of the grease has found its way onto the disc surface, clean with brake cleaner if necessary.
Now you can stick the screwdriver into the vents again and tighten the disc retainer a little more.

Bit unclear by the picture but I've lifted the rubber boot away from the piston and stuck in the straw from the spray grease. I do this to lubricate the piston but I've never seen anyone else do it!

Use the large grips to squeeze the piston back in. Move it very slowly until it's all the way back in.

The rubber should look neat and tidy and be behind the end of the piston. Sometimes the rubber looks a bit bulgy now. Lift the rubber (as in the pic before last) to release trapped air.

Apply some grease (copper fine, I used high temp again) to the edge of the pad where it touches the carrier. Take care not to let grease get onto the pads friction surface.

Clip the inner pad into the piston. Again remove any grease that may get onto the pad from fingers etc.

Install the outer pad and carefully replace the caliper over the carrier.

Like so. Now is the time to refit the front spring (not pictured here) as removed in step 10. This is possible by hand.

The caliper slides you removed in step 14 can now be cleaned and greased. Copper grease is fine. I have used rubber grease for this job.
Reinstall the two slides, tighten and refit the two plastic covers. Now refit the wheel and tighten the bolts as much as you can. Now enter the vehicle and depress the brake pedal several times HARD!
Get back out and check the wheel still spins freely. If it does, lower the vehicle and tighten the wheel bolts thoroughly. Proceed to the other side and repeat the job.
Remember to observe any bedding in procedure. Generally this consists of 200 miles gentle driving whilst the disc and pad surfaces mate properly.
Recheck the tightness of the wheel bolts after 100 miles driving. Enjoy your new brakes. Hope this has helped. Good day.....Dan